
[Home] [Resume] [Work Responsibilities] [Search Page] [IT Menu]

(DHCP)
One of the most labor-intensive and error-prone aspects of managing a TCP/IP network is assigning IP addresses to each host and workstation on the network. IP addresses must be unique. Unintentionally assigning the same IP address to two different computers can cause problems ranging from subtle workstation errors to a complete network crash. In the past, IP addresses had to be assigned manually, with all the difficulties that task implies. Installing a new workstation or relocating an existing one required that a technician make an on-site visit to configure the workstation with the appropriate IP address.
Windows NT Server greatly simplifies IP address management by using the Dynamic Host Configuration Protocol (DHCP). A DHCP server running on Windows NT Server is allocated a block of IP addresses, which are then available to be assigned automatically to workstations as needed. When a workstation running a DHCP client is booted, it requests an IP address from the DHCP server. The DHCP server assigns, or leases, an IP address to that workstation for the duration of its lease period, which is set by NTADMIN.
Using DHCP has the following advantages:
| The DHCP server allows centralized management of IP addressing information. If the DHCP server is set up properly, no address conflicts or TCP/IP configuration errors can occur on connected DHCP clients. Centralized management also means that your IP address management workload is greatly reduced. | |
| Because workstations are assigned an IP address at boot time, they can be moved freely from location to location without manually reconfiguring the IP address information each time a workstation is moved. This is a particularly useful feature as notebook computers become more prevalent, along with the need to simply plug them into whatever network port happens to be available without further ado. |
If a workstation is removed and then reconnected to the same subnet before the lease period has expired, that workstation is assigned its previous IP address, based on the MAC (or hardware) address of the NIC. If the workstation is connected to a different subnet or to the same subnet after the lease period expires, the next available IP address is assigned to it.
The DHCP server is assigned a block of IP addresses, referred to as a DHCP scope. For example, if InterNIC assigns your company the IP C block ranging from 207.104.167.1 to 207.104.167.255, you might choose to subnet this block using a net mask of 224 into six subnets, each supporting 30 hosts. You might then assign the subnet containing the IP addresses 207.104.167.33 through 207.104.167.62 as your DHCP scope, keeping the other subnet addresses for other uses. These 30 available IP addresses can then be assigned to DHCP clients automatically as needed. In addition to the pooled addresses assigned on a first-come, first-served basis to DHCP clients, the DHCP server can reserve specific IP addresses for use by servers and other systems for which a static IP address is necessary or desirable.
If your routers support RFC 1542, which defines forwarding of BOOTP and DHCP broadcasts, only one DHCP server is required to support your entire IP internetwork. If they don't, a DHCP server can serve only DHCP clients located on the same IP subnetwork, and you'll need to install a DHCP server on each subnet for complete coverage of your internetwork.
To be assigned an IP address automatically by the DHCP server, each workstation must have DHCP client software installed and enabled. Windows NT Server and Workstation versions 3.5 and higher have DHCP clients built in, as does Windows 95. You can DHCP-enable Windows 3.11 for Workgroups by installing Win32s and the Microsoft 32-bit TCP/IP VxD supplied with the Windows NT Server CD-ROM. DOS workstations can use DHCP if you install the Microsoft Network Client for MS-DOS 3.0 or higher real-mode TCP/IP driver supplied on the Windows NT Server distribution CD-ROM.
Non-DHCP clients can coexist on the same network with DHCP clients and can use TCP/IP and Windows networking services, but at the expense of requiring some manual intervention. IP addresses for non-DHCP clients must be assigned manually in the old manner, and IP addresses so assigned must be excluded from the DHCP scope to avoid duplication of IP address assignment.
To install DHCP, follow these steps:
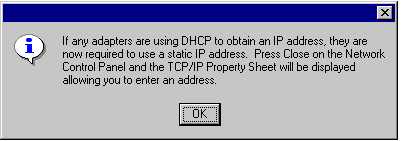
The Windows NT Setup dialog prompts you for the location of the DHCP distribution files. Enter the location and click Continue to begin copying the files. Windows NT displays a message saying that any adapters now using DHCP must be assigned a static IP address (see fig. 17.51). Click OK to continue.

The warning that adapters now using DHCP must be assigned a static IP address before installation can proceed.
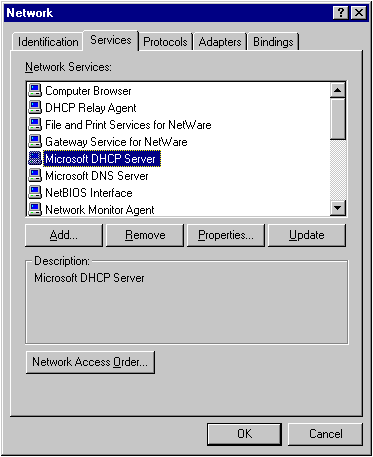
Windows NT displays the Network property sheet, shown in figure 17.52 with DHCP installed. Click Close to complete the installation of DHCP.

The Services page of the Network property sheet, with the Microsoft DHCP Server installed.
Windows NT Server analyzes the changes you've made to your network configuration. It first configures the bindings, then stores the bindings, and finally reviews the new bindings configuration.
After you install DHCP, follow these steps to configure it:
Using the DHCP Manager to configure and manage DHCP.

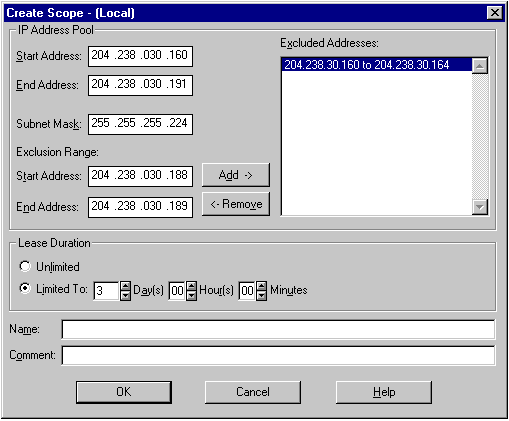
From the Scope menu
choose Create to display the Create Scope dialog. Enter the
range of IP addresses you want to comprise the scope. You can exclude
specific addresses and ranges of addresses from the scope. Specify the lease
duration as either Unlimited or as Limited to a specific number of Days,
Hours, and Minutes.
Entering a range of IP addresses to comprise the DHCP scope and configuring DHCP lease durations.

It's a good idea in general-and in particular if the demand for IP addresses in your organization outstrips the supply-to limit the DHCP lease duration to a reasonable time to prevent an idle client from holding an unused IP address. Many organizations find that two or three days is reasonable, although if IP addresses are in short supply, setting this parameter to one day or less is acceptable. Avoid setting it to too short a period, or clients will constantly be "churning" IP addresses.
After you complete all fields in the Create Scope dialog, click OK. In the DHCP Manager message box that appears (see fig. 17.55), click No to leave the DHCP scope inactive, or Yes to activate the newly defined DHCP scope. When the scope is activated, the newly defined scope appears in DHCP Manager (see fig. 17.56). When you're finished adding DHCP scopes, close DHCP Manager.
The DHCP Manager message that lets you activate your newly defined DHCP scope.

DHCP Manager displaying the newly defined scope.